Snowflake to GitHub integration is another example how data and analytics professionals can use change management and source control with Snowflake. GitHub has become a standard for cloud based version control, so we were thrilled to see Snowflake build a native integration that makes both public and secured private repository connectivity. In this article we cover connecting your Snowflake instance to GITHub.
Need help getting setup?
Feel free to schedule time with our DataTools doctors for an extra set of eyes and hands to get you moving in the right direction!
Create a personal access token in GitHub
You can click here to go directly to the “Generate new token page” or follow the steps below:
https://github.com/settings/personal-access-tokens/new
Access Settings: Log in to your GitHub account. Click on your profile picture in the top-right corner and select “Settings.”
Navigate to Developer Settings: In the left sidebar, click on “Developer settings.”
Personal Access Tokens: Under “Personal access tokens,” select “Fine-grained tokens.”
Generate New Token: Click on “Generate new token.”
There are a lot of options to configure fine grained access for your token, which is very helpful to narrow the scope of use for our specific Snowflake use case.
Configure Token:
- Token Name: Provide a descriptive name for the token.
- Expiration: Set an expiration date to enhance security. Typically we select a 90 day window and rotate keys as part of maintenance. Because this is a read-only token. The option to implement a non-expiring token exists but we do not recommend using it.
- Resource Owner: Choose the appropriate resource owner (your account or an organization).
- Repository Access: Select “Only select repositories.”
- Specify the repositories the token can access. You can start with a single repository and always come back to add more later. Do not grant access to “All repositories”
- Repository Access: Selected repositories → Choose only the repository you need.
- Permissions: Permissions can be daunting because there are so many options.. Here are the necessary permissions for use with Snowflake. This is to ensure you have designed your token for minimal access:
- Required: Metadata, Contents.
- Optional: Actions (if relevant to your setup).
This setup ensures your token is secure and adheres to the principle of least privilege, giving Snowflake only the access it needs to function properly with your GitHub repository. Let me know if you need further clarification!
Generate Token: After configuring the settings, click “Generate token.” Ensure you copy and store the token securely, as it will not be displayed again.
Learn more about personal access tokens from GitHub documentation
Save your Token
Store your token in a safe location, specifically a key vault like Azure Keyvauflf or password management app like 1Passeord.

Snowflake Creating and securing your GITHub secret
Before adding your repository, you will want to create a GITHub secret which includes your username and secret.
We recommend naming your secret the secret to align to the user and app it belongs to. Inside of Snowflake, this is the code you will insert:
-- SAVE YOUR SECRET
CREATE OR REPLACE SECRET <my_github_secret_name>
  TYPE = password
  USERNAME = 'your_github_username'
  PASSWORD = 'your_personal_access_token';
If you are running this code inside of Snowflake, do not save your code with the personal access token included.
Create your Snowflake to GitHub Integration
Inside of Snowflake you can select your schema and click “Add GIT” which will open a workbook and populate code that you can use as a template.
Create a name for your integration that will appear as your repository. You will want to use a descriptive integration. You shoul use a descriptive naming convention so you and others can follow. <integrationname>
Replace <your_github_username> with your actual GITHub username. Do not remove the single quotes.
Replace <“my_github_secret> with the secret you created in the previous step. Do not remove the single quotes.
// A user with the CREATE INTEGRATION privilege granted may run this query to create an API integration allowing users to connect to a git provider.
 // For more information, see: https://docs.snowflake.com/en/developer-guide/git/git-setting-up#create-an-api-integration-for-interacting-with-the-repository-api
create or replace api integration <integrationname>
    api_provider = git_https_api
    api_allowed_prefixes = ('https://github.com/<your_github_username>')
    enabled = true
    allowed_authentication_secrets = ('<my_github_secret>')
    -- comment='<comment>';
When you execute this code you will get a message: “Integration FCGITHUB successfully created.”
Attach your GITHub Repository
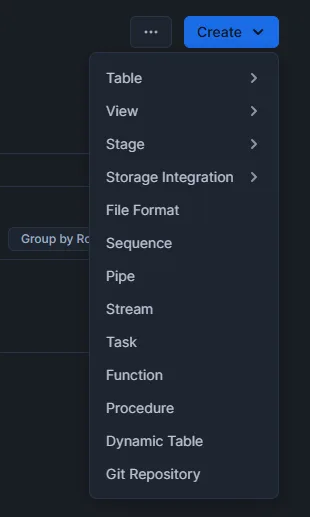
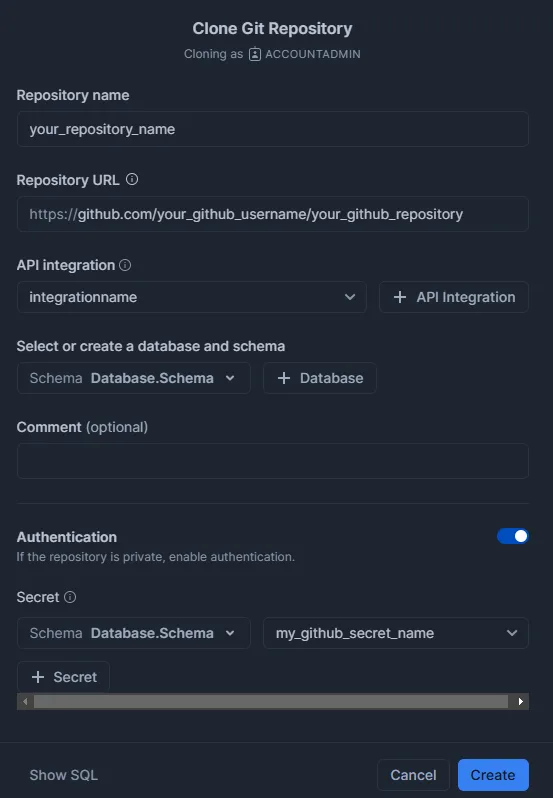
Navigate to your Databases in Snowflake and select the schema for which you would like to attach your repository and click Git Repository

CREATE GIT REPOSITORY <your_repository_name>
	ORIGIN = 'https://github.com/<your_github_username>/<your_github_repository>'
	API_INTEGRATION = '<integrationname>'
	GIT_CREDENTIALS = '<database>.<schema>.<my_github_secret_name>'
	COMMENT = '<enter any other descriptive info as a comment>';
