Measure Picker allows you to create a Tableau dynamic measure with a dashboard extension. As a result, dashboard builders can provide dynamic measure selection for end users.
How it Works?
Measure picker has two modes of enabling dynamic measure selection in Tableau
- Click Mode: Click on measure cells in your worksheet to capture the measure name
- Dropdown Mode: Select measures from a dropdown menu styled like Tableau’s native parameter controls
The selected measure is automatically written to a string parameter, enabling dynamic dashboard filtering, calculations, and visualizations.
Key Benefits
- ✅ Dynamic Measure Selection: Change measures without editing the workbook
- ✅ User-Friendly Interface: Intuitive click or dropdown selection
- ✅ Formula Generation: Automatically generates Tableau formulas for calculated fields
- ✅ Flexible Configuration: Choose between click, dropdown, or both modes
- ✅ Production-Ready: Secure domain whitelisting for Tableau Server deployments
Getting Started
Prerequisites
- A dashboard with at least one worksheet containing measures
- 1 string parameter in your workbook (the extension will update this parameter)

Quick Start
1. Add the extension to your dashboard
2. Select Configure it from the extension menu
3. On the General tab, selecting a worksheet that contains measures
4. Select the parameter to update
That’s it! Your extension is activated.
Installation
For Tableau Desktop Users
- Download the Extension
- Download the
measure-picker.trexfile from the repository - Or clone the repository to get all files
- Download the
- Add Extension to Dashboard
- Open your Tableau workbook
- Navigate to a dashboard
- Drag an Extension object onto the dashboard
- In the dialog, click Choose an Extension
- Select the
measure-picker.trexfile - Click OK
- Configure the Extension
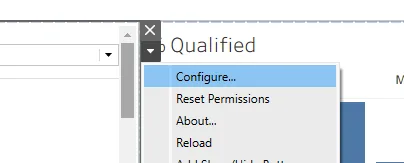
- Right-click on the extension object
- Select Configure from the context menu
- Follow the configuration steps below
For Tableau Server Users
- Upload Extension to Server
- Log in to Tableau Server as an administrator
- Go to Settings → Extensions
- Click Upload Extension
- Select the
measure-picker.trexfile - Click Upload
- Add Extension to Dashboard
- Open your workbook on Tableau Server
- Edit the dashboard
- Add an Extension object
- Select the uploaded extension
- Configure the Extension
- Right-click on the extension object
- Select Configure
- Follow the configuration steps below
Note: For Tableau Server deployments, your administrator must configure domain whitelisting.
Configuration
Step 1: Select Worksheet
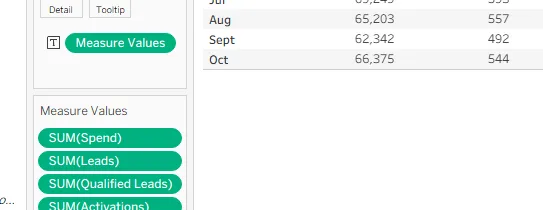
Choose the worksheet that contains the measures you want to select from. The extension will extract all available measures from this worksheet.
Tips:
- Select a worksheet that contains all measures you want users to choose from
- The worksheet should have measures visible (either in columns or rows)
- If using “Measure Names” on rows/columns, ensure it’s properly configured
Step 2: Select Parameter
Choose a string parameter that will store the selected measure name.
Important:
- ⚠️ The parameter must be a string type (text parameter)
- ⚠️ Other parameter types (integer, float, date, etc.) are not supported
- The extension will validate the parameter type and show a warning if incorrect
Creating a String Parameter:
- Right-click in the Data pane
- Select Create Parameter
- Set Data type to String
- Set Allowable values to All (or specific list)
- Give it a descriptive name (e.g., “Selected Measure”)
Step 3: Configure Options
Enable Dropdown Mode
- Checked: Shows a dropdown menu for measure selection (recommended for most users)
- Unchecked: Uses click mode (click on worksheet cells to select measures)
Enable Dual Mode
- Checked: Allows both dropdown selection AND clicking marks simultaneously
- Unchecked: Only one mode active at a time
- Note: Only available when dropdown mode is enabled
Enable Debug Logging
- Checked: Shows detailed status information and console messages (useful for troubleshooting)
- Unchecked: Minimal UI, cleaner appearance
- Default: Enabled (for initial setup and troubleshooting)
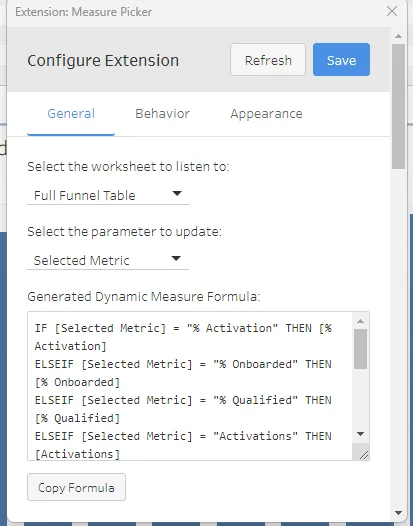
Step 4: Review Generated Formula
After selecting a worksheet and parameter, the extension automatically generates a Tableau formula based on all available measures. This formula can be used to create a calculated field.
To use the formula:
- Copy the formula from the text box
- In Tableau, create a new calculated field
- Paste the formula
- The calculated field will return different measures based on the parameter value
Using the Extension
Click Mode
When dropdown mode is disabled:
- Click on a measure cell in the configured worksheet
- The measure name is automatically captured
- The parameter is updated with the selected measure
- Any calculations or filters using the parameter will update automatically
Best for:
- Interactive dashboards where users explore data
- When you want users to click directly on visualizations
- Dashboards with multiple measure visualizations
Dropdown Mode
When dropdown mode is enabled:
- Select a measure from the dropdown menu
- The parameter updates immediately
- All dependent calculations and filters update
Best for:
- Dashboards where users need to quickly switch between measures
- When you want a consistent, familiar interface (matches Tableau parameter controls)
- Production dashboards with specific measure sets
Dual Mode
When both dropdown and dual mode are enabled:
- Users can select from dropdown OR click on worksheet cells
- Both methods update the same parameter
- The extension prevents infinite loops between the two methods
Best for:
- Dashboards that need maximum flexibility
- When different users prefer different interaction methods
- Complex dashboards with multiple interaction points
Features
Dynamic Measure Formula Generation
The extension automatically generates a Tableau IF/ELSEIF formula based on all measures found in the selected worksheet:
IF [Selected Measure] = "Sales" THEN [Sales]
ELSEIF [Selected Measure] = "Profit" THEN [Profit]
ELSEIF [Selected Measure] = "Quantity" THEN [Quantity]
END
How to use:
- Copy the generated formula from the configuration dialog
- Create a new calculated field in Tableau
- Paste the formula
- Use the calculated field in your visualizations
Robust Measure Detection
The extension uses multiple methods to find measures:
- Primary: Extracts from worksheet summary data (what’s visible in the visualization)
- Fallback: Reads from data source fields (all available measures)
- Smart Filtering: Handles parameter-filtered views correctly
This ensures you always see all available measures, even if the current view is filtered.
Parameter Type Validation
The extension validates that the selected parameter is a string type:
- Shows a warning if a non-string parameter is selected
- Prevents saving invalid configurations
- Provides clear error messages
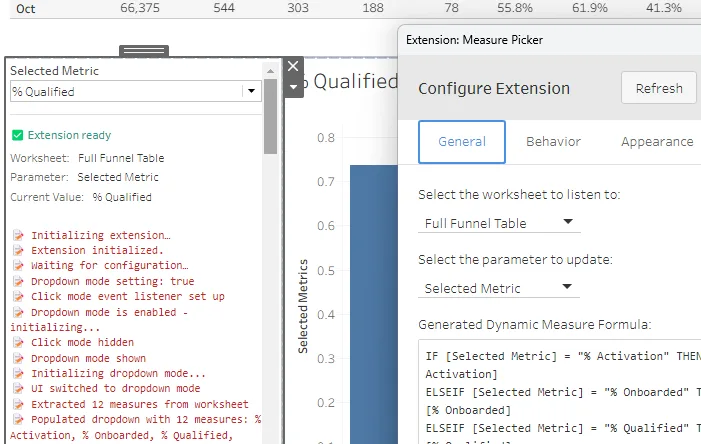
Debug Mode
When enabled, debug mode provides:
- Detailed status information
- Current worksheet and parameter names
- Last selected measure
- Error messages and troubleshooting information
- Console logging for developers
To toggle debug mode:
- Open the configuration dialog
- Check/uncheck “Enable debug logging”
- Click OK
Troubleshooting
Extension Doesn’t Load
Symptoms: Extension shows error or doesn’t appear
Solutions:
- Verify the extension URL is correct and accessible
- Check browser console (F12) for errors
- Ensure HTTPS is used (required for Tableau Extensions)
- Verify domain whitelist is configured (Tableau Server only)
No Measures Found
Symptoms: Dropdown is empty or “No measures found” message
Solutions:
- Verify the selected worksheet contains measures
- Check that measures are visible in the worksheet (not hidden)
- Try selecting a different worksheet
- Ensure “Measure Names” is properly configured if used
- Check debug mode for detailed error messages
Parameter Not Updating
Symptoms: Selecting a measure doesn’t update the parameter
Solutions:
- Verify the parameter is a string type
- Check that the parameter name matches what’s configured
- Ensure the parameter is not locked or read-only
- Try refreshing the dashboard
- Check debug mode for error messages
Formula Not Generating
Symptoms: Formula box is empty or shows error
Solutions:
- Ensure both worksheet and parameter are selected
- Verify the worksheet contains measures
- Check that measures are accessible (not filtered out)
- Try clicking “Refresh” in the configuration dialog
- Check browser console for errors
Dropdown Not Appearing
Symptoms: Dropdown mode is enabled but dropdown doesn’t show
Solutions:
- Verify dropdown mode is checked in configuration
- Ensure the extension is properly configured (worksheet + parameter selected)
- Check that measures were found (dropdown needs measures to populate)
- Try reconfiguring the extension
- Check debug mode for status information
“Unauthorized” Error (Tableau Server)
Symptoms: Extension shows “Unauthorized” message
Solutions:
- Contact your Tableau Server administrator
- Verify your domain and site are whitelisted
- Check the error message for the exact domain:site format needed
- Ensure you’re accessing from an authorized Tableau Server domain
Click Mode Not Working
Symptoms: Clicking on cells doesn’t capture measures
Solutions:
- Verify click mode is enabled (dropdown mode unchecked, or dual mode enabled)
- Ensure the worksheet is properly configured
- Check that “Measure Names” field is present in the worksheet
- Try clicking on different cells (some may not contain measure names)
- Check debug mode for detailed information
Tableau Dynamic Measure Examples
Example 1: Sales Dashboard with Measure Selector
Scenario: Create a dashboard where users can switch between Sales, Profit, and Quantity measures.
Steps:
- Create a string parameter named “Selected Measure”
- Add the Measure Picker extension to your dashboard
- Configure:
- Worksheet: Select a worksheet with Sales, Profit, and Quantity measures
- Parameter: Select “Selected Measure”
- Enable dropdown mode: ✓
- Copy the generated formula and create a calculated field
- Use the calculated field in your visualizations
- Users can now select measures from the dropdown
Example 2: Interactive Exploration Dashboard
Scenario: Allow users to click on different measures in a crosstab to explore data.
Steps:
- Create a string parameter named “Measure to Analyze”
- Add the Measure Picker extension
- Configure:
- Worksheet: Select the crosstab worksheet
- Parameter: Select “Measure to Analyze”
- Enable dropdown mode: ✗ (use click mode)
- Enable dual mode: ✗
- Users can click on measure cells to update the parameter
- Other visualizations filter/calculate based on the selected measure
Example 3: Multi-Mode Dashboard
Scenario: Provide both dropdown and click options for maximum flexibility.
Steps:
- Create a string parameter named “Current Measure”
- Add the Measure Picker extension
- Configure:
- Worksheet: Select worksheet with all measures
- Parameter: Select “Current Measure”
- Enable dropdown mode: ✓
- Enable dual mode: ✓
- Users can use either method to select measures
- Both methods update the same parameter seamlessly
Example 4: Using the Generated Formula
Scenario: Create a calculated field that returns different measures based on parameter selection.
Steps:
- Configure the extension and copy the generated formula
- In Tableau, create a new calculated field:
- Name: “Dynamic Measure”
- Formula: Paste the copied formula
- Use “Dynamic Measure” in your visualizations:
- Drag to Rows/Columns
- Use in filters
- Use in other calculations
- When users select a measure, “Dynamic Measure” updates automatically
Example Formula:
IF [Selected Measure] = "Sales" THEN [Sales]
ELSEIF [Selected Measure] = "Profit" THEN [Profit]
ELSEIF [Selected Measure] = "Quantity" THEN [Quantity]
ELSEIF [Selected Measure] = "Discount" THEN [Discount]
END
Best Practices
Parameter Setup
- ✅ Use descriptive parameter names (e.g., “Selected Measure” not “Param1”)
- ✅ Set default values that make sense for your dashboard
- ✅ Consider using “All” allowable values for maximum flexibility
Worksheet Selection
- ✅ Choose a worksheet that contains all measures users need
- ✅ Ensure measures are visible and accessible
- ✅ Consider creating a dedicated “measure reference” worksheet
User Experience
- ✅ Use dropdown mode for production dashboards (more intuitive)
- ✅ Use click mode for exploratory dashboards
- ✅ Enable debug mode during development, disable for end users
- ✅ Provide instructions or tooltips for users
Performance
- ✅ Limit the number of measures if possible (large lists can be slow)
- ✅ Use data source fields fallback for better performance
- ✅ Consider caching measures if worksheet is complex
Security
- ✅ Configure domain whitelisting for Tableau Server deployments
- ✅ Review and update whitelist regularly
- ✅ Use separate dev/prod environments
Support
Getting Help
- Issues, questions, and enhancements : Contact support@datatoolspro.com
Reporting Issues
When reporting issues, please include:
- Tableau version (Desktop/Server and version number)
- Extension version
- Steps to reproduce
- Error messages (from debug mode if available)
- Screenshots if applicable
Version History
Version 1.1.2
- Initial release
- Click mode and dropdown mode
- Dual mode support
- Dynamic formula generation
- Debug logging
- Parameter type validation
- Domain whitelisting for Tableau Server